
What Is Image Alt Text and Why Does It Matter?
When a browser loads a webpage, every image has an alt attribute in its HTML code. That attribute holds a short text description of what the image shows. Most visitors never see it. But for some people and for search engines, it’s the most important part of the image.
Who actually uses image alt text?
Generally, three groups depend on the image alt text.
Screen reader users. People with visual impairments use software that reads webpage content aloud. When the screen reader reaches an image, it reads the alt text out loud. If the alt text is missing or unhelpful, like a non-identifiable file name “IMG00023.JPG“, the user gets no useful information. However, if the image alt text is descriptive and accurate, they get the same understanding as a sighted user would.
Users with slow connections. When an image fails to load due to a slow internet connection, an incorrect file path, or a server error, alt text is displayed in place of the image. This tells the visitor what content type was supposed to be there.
Search engines. Google or other search engine cannot see images the way humans do. It reads the alt attribute to understand what the image shows. So, if you add well-defined alt text, it helps Google index images correctly and surfaces them in Google Images, Google Discover, and regular search results.
Alt text vs caption vs title – what’s the difference?
Now, we know what image alt text is. But most people confuse alt text with captions and titles. Typically, it’s easy to confuse these three things, especially within CMS platforms, where they appear side by side as separate fields.
Let’s know each of them better:
- Alt text is invisible to most visitors. It lives in the HTML alt attribute and is read by screen readers and search engines. Its job is to describe what the image shows.
- Caption is visible text displayed below or beside the image on the page. It adds context for all visitors. It’s optional and conversational.
- Title attribute is hover text that appears when a user moves their mouse over the image. It’s rarely read by screen readers and has almost no SEO value. It’s intended for human readers only.
For SEO and accessibility, alt text is the one that matters most. Captions help users. Title attributes are largely optional.
Why Image Alt Text Matters for SEO
Google’s image search is a significant traffic source for many websites. For Google to include an image in search results, it needs to understand what that image shows. Alt text is the clearest signal.
Beyond image search, alt text contributes to the overall context of a page. For example, a page about “Balcony Gardening Seeds” with images that all have descriptive, relevant alt text sends clearer topical signals than a page where every image says a vague file name like “image1.jpg.”
Alt text also ties into structured data. For rich results like recipe cards and product listings, the image attribute in schema markup is required, and the alt text on that image reinforces the relevance of the structured data.
How to Write Good Alt Text for Images
Before covering how to add alt text on different platforms, it’s worth knowing how to write the best image alt text. Because it gets worse when someone adds bad alt text. Writing incorrect information is not only unhelpful, but it can also confuse search engines and hinder the work of visually impaired users.
The core rule: describe function, not appearance
The best way is to ask yourself: if this image disappeared, what would someone need to know?
For an informational image like a chart, a diagram, a screenshot, it’s ideal to describe what it shows and why it matters in context. For a product image, describe the product as it appears. For a decorative image that adds no informational value, leave the alt text empty.
Keep it concise
Aim for 40 to 125 characters. Long alt text interrupts the flow for screen reader users. Short, vague alt text doesn’t give enough information.
Here’s an example:
| Good: | “Red ceramic pour-over coffee dripper on a white kitchen counter” |
| Too short: | “coffee” |
| Too long: | “A red ceramic pour-over coffee dripper sitting on a clean white kitchen counter next to a glass carafe, with morning sunlight coming through a window in the background, in a minimalist modern kitchen” |
Include keywords naturally – don’t stuff them
If the image is relevant to a keyword the page targets, include it in the alt text. But write it as a natural description first. Keywords should fit in, not be forced.
| Bad: | “alt text alt text how to add alt text add alt text images website” |
| Good: | “Screenshot showing how to add alt text in WordPress block editor” |
When to use empty alt text
Not every image needs a description. We normally use different types of decorative images, such as dividers, background patterns, and abstract shapes used for layout. And these images add nothing informational. For these, use alt=”” (empty attribute). This tells screen readers to skip the image entirely, which keeps the reading experience clean.
But remember that you should never omit the alt attribute completely. Without it, screen readers read the filename aloud. alt=”” and no alt attribute are not the same thing.
Alt text for linked images
When an image is wrapped in a link, the alt text acts as the anchor text for that link. It should describe where the link goes, not just what the image shows.
Example: a logo image that links back to the homepage should have alt=”WebAshes homepage” – not alt=”WebAshes logo”.
Should You Use AI-generated alt text?
AI tools can generate a first draft of alt text, but they have some real limitations. They analyze pixel content but can’t understand context – why the image is on the page or what it means in relation to the surrounding text. AI descriptions are often either too vague (“a man standing”) or too literal (describing every visual detail without capturing meaning). Use AI suggestions as a starting point, not a final answer. Always review and edit before publishing.
How to Add Image Alt Text in HTML
The alt attribute is part of the HTML <img> tag. Everything CMS platforms do behind the scenes comes down to this. Understanding the HTML method gives a clearer picture of how alt text actually works, and it’s the only option for developers building custom pages or working outside a CMS.
Basic image alt text
The standard way to add alt text to an image in HTML:
| <img src=”coffee-dripper.jpg” alt=”Red ceramic pour-over coffee dripper on a white counter”> |
The alt attribute sits inside the <img> tag. It’s that simple. The value inside the quotes is what screen readers read and what search engines index.
For a decorative image that screen readers should skip:
| <img src=”divider-pattern.jpg” alt=””> |
The attribute is present but empty. This is intentional and correct.
Never write this:
| <img src=”coffee-dripper.jpg”> |
Without the alt attribute entirely, screen readers read the filename aloud. That’s not helpful for anyone.
Alt text for linked images
When an image is wrapped in an anchor tag to make it a clickable link, the alt text should describe the destination, not the image itself.
| html<a href=”https://webashes.com”> <img src=”webashes-logo.png” alt=”WebAshes homepage”></a> |
https://webashes.com/category/agentic-commerce
If the link goes to a blog category page:
| html<a href=”/category/agentic-commerce”> <img src=”agentic-commerce-banner.jpg” alt=”Blog Category for Agentic Commerce”></a> |
The alt text here functions as anchor text. Google uses it to understand what the linked page is about. And this is the same way it uses anchor text on a regular text link.
Alt text for SVG images
There are two ways to use SVGs on a webpage: as an <img> tag pointing to an external file, or as inline SVG code embedded directly in the HTML. Each handles alt text differently.
External SVG file (used as an img tag):
| html<img src=”icon-arrow.svg” alt=”Right-pointing navigation arrow”> |
Same as any other image. The alt attribute goes directly in the <img> tag.
Inline SVG (embedded in the HTML):
Inline SVGs don’t use an alt attribute. Instead, use the <title> element inside the SVG code:
| html<svg role=”img” xmlns=”http://www.w3.org/2000/svg” viewBox=”0 0 24 24″> <title>Right-pointing navigation arrow</title> <path d=”M8 5l8 7-8 7″/></svg> |
Two things matter here: the <title> element provides the description, and role=”img” tells assistive technology to treat the SVG as an image. Without role=”img”, some screen readers may not read the title at all.
For a decorative inline SVG that should be ignored:
| html<svg aria-hidden=”true” xmlns=”http://www.w3.org/2000/svg” viewBox=”0 0 24 24″> <path d=”M8 5l8 7-8 7″/></svg> |
aria-hidden=”true” hides the element from screen readers entirely.
Responsive images with srcset
Responsive images use the srcset attribute to serve different image sizes depending on the screen. The alt attribute goes on the <img> tag, not on individual srcset entries.
| html<img src=”product-small.jpg” srcset=”product-small.jpg 480w, product-medium.jpg 800w, product-large.jpg 1200w” sizes=”(max-width: 600px) 480px, (max-width: 900px) 800px, 1200px” alt=”ElementsKit plugin dashboard showing widget library”> |
The alt text applies to the image regardless of which size gets served. Write it once and it covers all versions.
For the <picture> element:
| html<picture> <source srcset=”product.webp” type=”image/webp”> <source srcset=”product.jpg” type=”image/jpeg”> <img src=”product.jpg” alt=”ElementsKit plugin dashboard showing widget library”></picture> |
The alt attribute always goes on the fallback <img> tag inside <picture>, not on the <source> elements.
Alt text for CSS background images
This is where things get complicated. CSS background images — set using background-image in a stylesheet — do not support the alt attribute. There is no native way to add alt text to a CSS background image.
This is why Google recommends avoiding CSS for important images. If an image carries meaningful information, it should be in an <img> tag in the HTML, not a CSS background property.
That said, background images are widely used for hero sections, banners, and decorative layouts. When a background image is purely decorative, leaving it without alt text is fine — the browser treats CSS backgrounds as presentational by default.
When a background image carries meaning, there are two workarounds:
Option 1: aria-label on the container
| html<div style=”background-image: url(‘hero-banner.jpg’)” role=”img” aria-label=”Marketing team collaborating around a laptop in a modern office”></div> |
role=”img” tells assistive technology to treat the div as an image. aria-label provides the description. This is the most widely supported workaround.
Option 2: visually hidden text inside the container
| html<div style=”background-image: url(‘hero-banner.jpg’)”> <span class=”sr-only”>Marketing team collaborating around a laptop in a modern office</span></div> |
The .sr-only class hides the text visually while keeping it readable for screen readers:
| css.sr-only { position: absolute; width: 1px; height: 1px; padding: 0; margin: -1px; overflow: hidden; clip: rect(0, 0, 0, 0); white-space: nowrap; border: 0;} |
Both workarounds are valid. The aria-label approach is slightly cleaner because it doesn’t add extra HTML elements. The visually hidden text approach is more compatible with older assistive technologies.
Important: Neither workaround fully replaces a proper <img> tag with an alt attribute. If an image is important enough to require a description, the best solution is to use an <img> tag rather than a CSS background.
How to Add Image Alt Text in WordPress
WordPress is the most popular CMS in the world; if your website is running on this platform. Then, there’s the tree default and prominent places to add alt text in WordPress. Each one works slightly differently and applies to different situations.
Method 1: Via the Media Library (recommended for site-wide consistency)
The Media Library is the best place to set alt text for images you use repeatedly – logos, team photos, product images, or any image that appears on more than one page.
When you set alt text in the Media Library, it becomes the default alt text every time that image is inserted anywhere on the site. You don’t have to re-enter it each time.
How to do it:
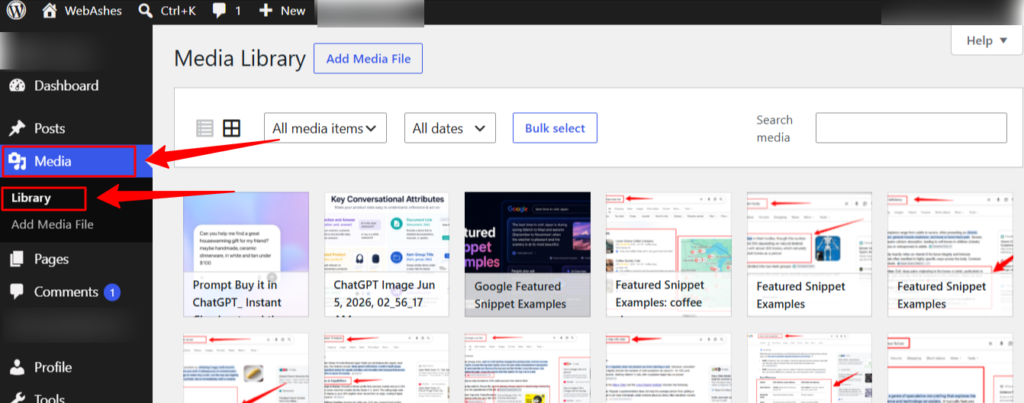
From your WordPress dashboard, navigate to to Media → Library in your WordPress dashboard. Then, click the image you want to edit
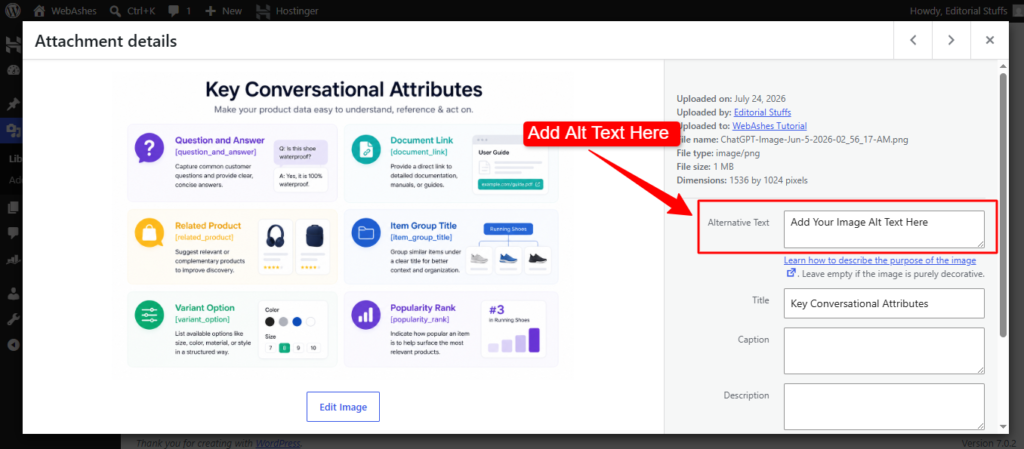
Here, on the right side panel, find the “Alt Text” field. Type your description and click “Update”.
This sets the default alt text for that image. Individual posts or pages can still override it, but this is the baseline.
Method 2: Via the Block Editor (Gutenberg)
This is the most common method for adding or editing alt text on a specific page or post without going to the Media Library.
How to do it:
From your WordPress dashboard, open a page or post in the block editor:
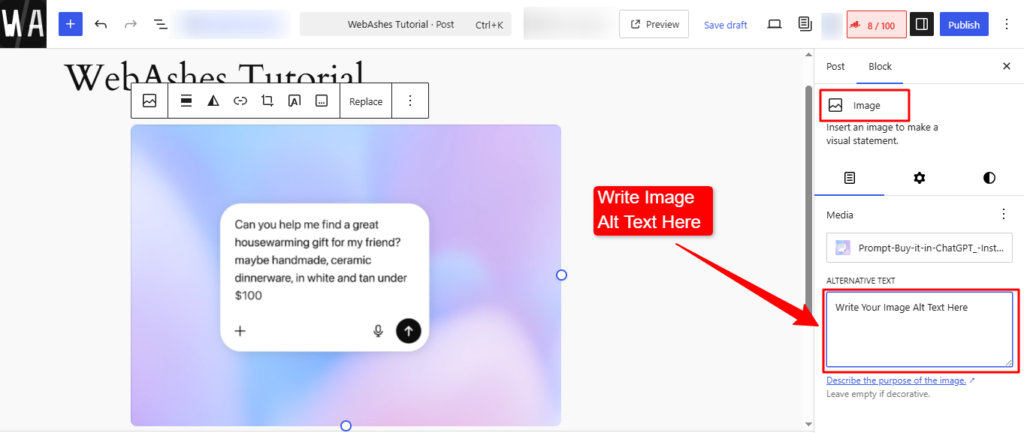
- Open the page or post in the Block Editor
- Click the image block you want to edit
- In the right sidebar, make sure you’re on the “Block” tab (not “Document”)
- Find the “Alt Text (Alternative Text)” field
- Type your description directly in the field
- The change saves automatically when you save or update the page
One thing to note: if the image already has alt text set in the Media Library, that text will pre-fill here. You can leave it or override it for this specific use.
A quick note on WordPress alt text priority
WordPress has a hierarchy when it comes to alt text:
- Alt text entered in the Block Editor or Classic Editor for a specific image instance – this takes priority
- Alt text set in the Media Library – this is the fallback default
If you enter alt text in the Media Library and later change it in the Block Editor, the Block Editor version will be the one that will appear on the page.
How to Add Alt Text in Elementor
Elementor adds alt text slightly differently when you add the image widget; you have to set the alt text through the Media Library.
How to add image alt text in Elementor:
Get started by opening the page in the Elementor editor. As the Elementor editor loads on your screen, click the Image widget you want to edit
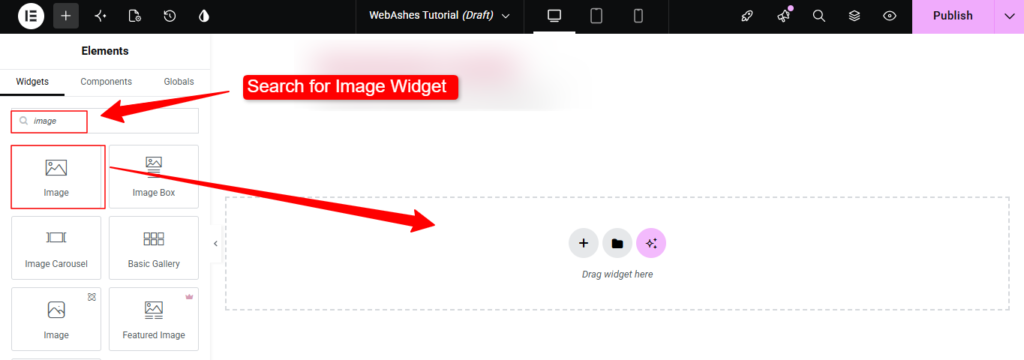
- In Elementor, click the image widget to select it and in the left sidebar click the + icon to upload an image.
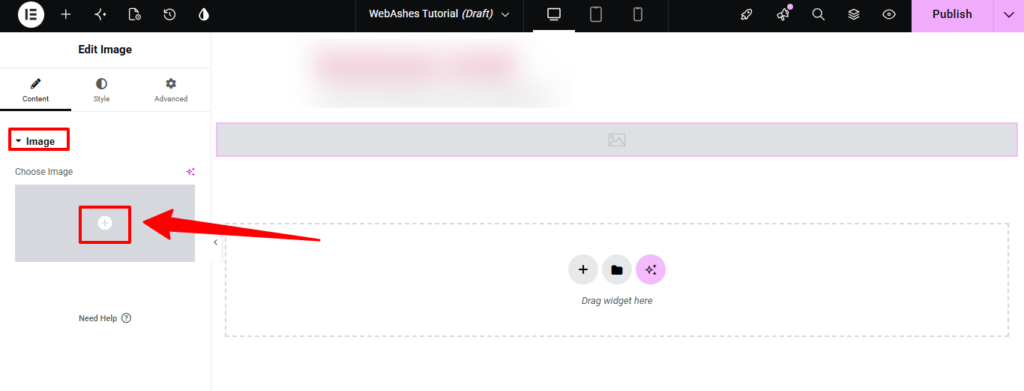
In the left panel, click the current image to open the Media Library. Select the image.
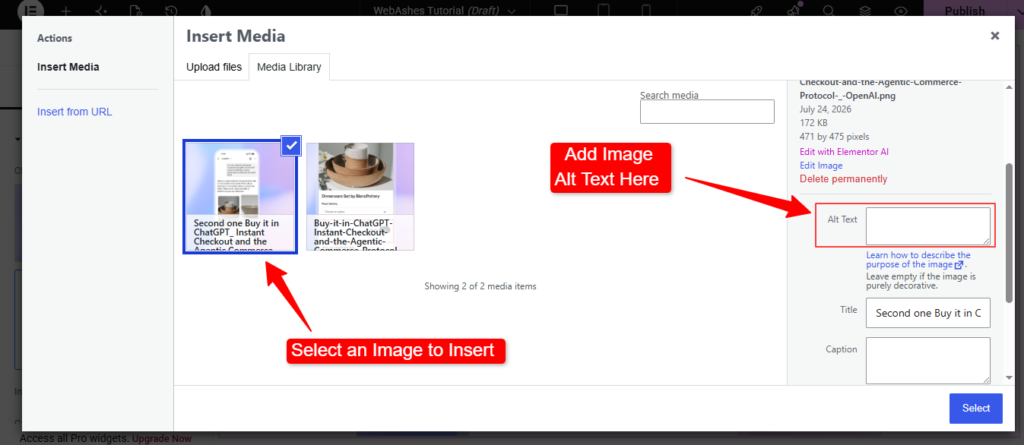
On the right side of the Media Library panel, find the “Alt Text” field and type your description. And, lastly, click the “Select” button.
Alt text entered here updates the Media Library default for that image. It will pre-fill in other places where the same image is used across the site.
How to Add Alt Text for Background Images in Elementor
An Elementor user generally adds different types of background image options for sections, columns, and containers. However, Elementor doesn’t provide a native alt text field. This is the same limitation as CSS background images generally.
The workaround in Elementor:
Open your Elementor editor and click the section or container with the background image. Then, go to the Advanced tab → Attributes
Add the following custom attribute:
role=”img”
Then add a second attribute:
aria-label=”Your description here”
This applies the same role=”img” and aria-label workaround from the HTML method, but done through Elementor’s interface without touching code.
Note: The Attributes option is available in Elementor Pro. If using the free version, the workaround requires adding custom CSS or using a code snippet plugin to apply aria-label to the relevant container.
Also See: AI Featured Snippet Examples
How to Add Image Alt Text in Shopify
Shopify has a few different places where images live, and each one has its own method for adding alt text.
Method 1: Product images
This is the most important place to add alt text in Shopify. Product images appear in search results, Google Shopping, and image search. So descriptive alt text here directly affects visibility.
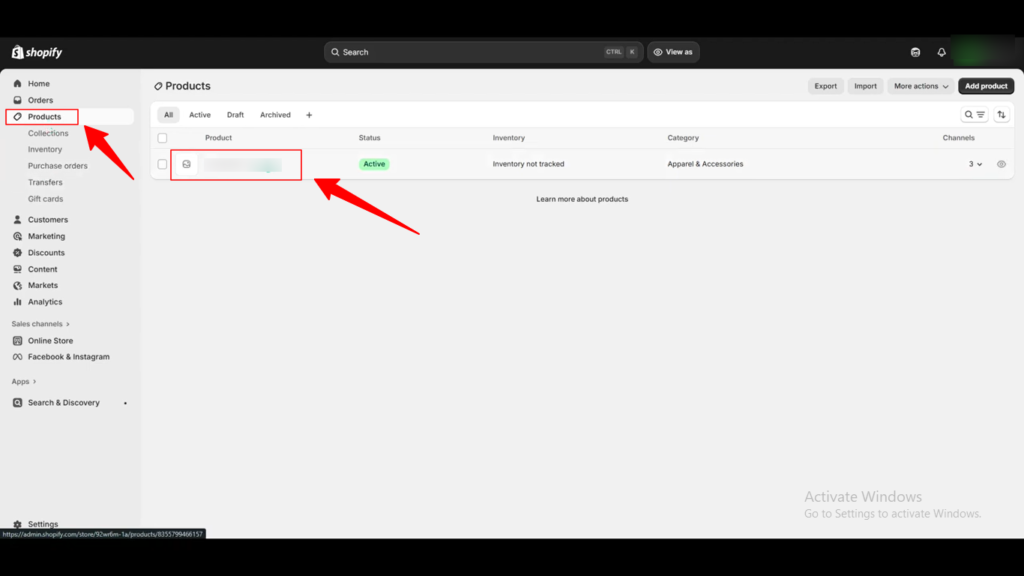
To add image alt text for your Shopify product, log in to your Shopify Admin dashboard. Then, click the Products option, and the list of all of your products will appear. Then, open the product you want to edit.
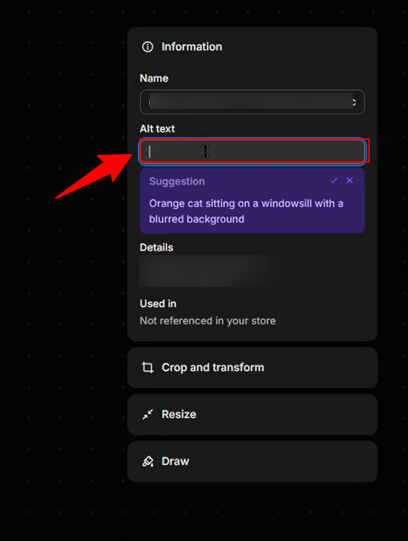
Click the product image, and it will open up in a larger screen with some additional image editing settings. You will see the alt text box; just enter the image alt text for your Shopify product and hit the Save button.
Keep product image alt text descriptive and specific. Include the product name, key attributes, and any relevant details. For example: “Navy blue slim-fit chino trousers folded on a white surface” rather than just “trousers.”
Method 2: Add Image Alt Text to Shopify Collection images
Shopify collection images, which are the banner or feature images displayed at the top of a product category page, have their own alt text field.
For this, go to Admin → Products → Collections and click the collection you want to edit. Scroll to the Collection image section, hover over the image, and click the “Edit” option that appears. Enter your description in the alt text field and save.
Method 3: Theme and banner images via the Customizer
Images added through the Shopify theme editor, such as hero banners, slideshow images, and promotional images, are edited through the visual customizer.
Go to Online Store → Themes and click “Customize” on your active theme. Click the image or section containing the image you want to edit. In the left sidebar, find the image block and look for the “Image alt text” or “Alt text” field. Type your description and save.
The exact label depends on the theme. Some Shopify themes call it “Image alt text,” others just “Alt text.” It always appears in the left sidebar panel when the image block is selected.
Method 4: Files section
For images uploaded directly to Shopify’s Files section and used in blog posts, pages, or email campaigns, their alt text can be added when inserting the image into content.
Open a Page or Blog Post in the editor and click the image icon to insert an image. Select your image from the files panel. Before inserting, look for the “Image alt text” field in the insertion dialog, add your description, then insert the image.
Background images in Shopify
Shopify theme background images don’t support alt text natively through the customizer. The workaround requires editing theme code directly.
Go to Online Store → Themes → Actions → Edit code and find the relevant section file. For example, sections/hero.liquid. Locate the element using the background image and add role=”img” and aria-label attributes to it:
| <div class=”hero-banner” style=”background-image: url(‘{{ section.settings.image | img_url }}’)” role=”img” aria-label=”Your description here”></div> |
Note: If editing theme code feels risky, duplicate the theme first and make changes on the copy.
How to Add Image Alt Text in Wix
Wix handles alt text directly on the canvas through the image settings panel.
Method 1: Standard image on canvas
Open your site in the Wix Editor and click the image you want to edit.
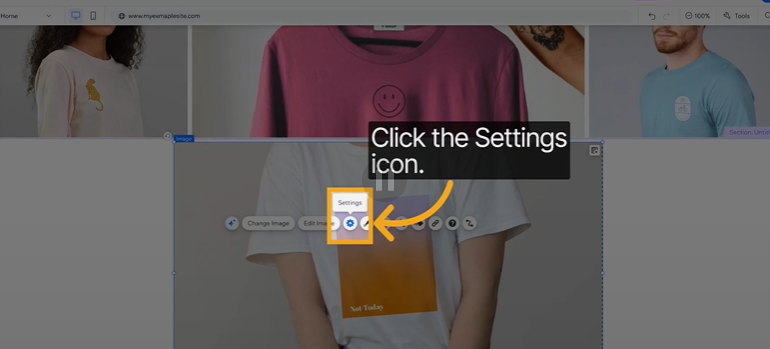
A small toolbar appears above the image. Click the settings icon (gear icon) in that toolbar.
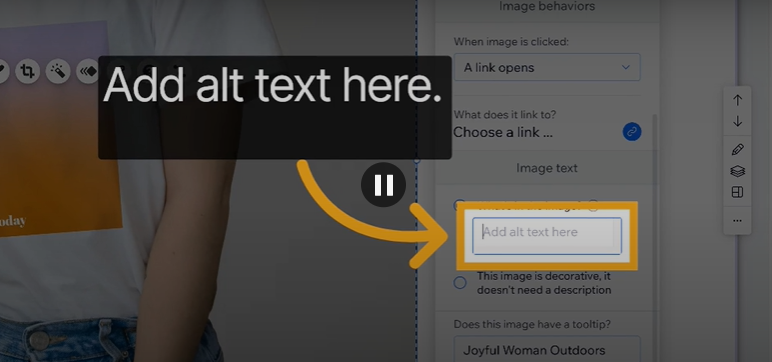
A settings panel opens on the right. Find the “What’s in the image?” field. This is Wix’s label for alt text, so type your description and click “Done”.
Again, Wix uses “What’s in the image?” instead of “Alt text” – it’s the same thing. Whatever is typed here becomes the alt attribute in the page’s HTML.
Method 2: Via the Accessibility panel
Right-click the image directly on the canvas. Select “Accessibility” from the context menu that appears. A small panel opens with a dedicated alt text field. Enter your description and save.
Both methods produce the same result. The gear icon method is faster for most users. The right-click accessibility route is useful if the toolbar isn’t appearing as expected.
Background images in Wix
Background images set through strip or section background settings don’t have a native alt text field in Wix. This is a known platform limitation.
The workaround uses Wix Velo. First, give the strip or section an ID by clicking it, then clicking the three dots menu and selecting “Set as ID”. Then go to Developer Tools and enable Velo by Wix. In the page code panel, add the following:
| $w.onReady(function () { $w(“#myStrip”).setAttribute(“role”, “img”); $w(“#myStrip”).setAttribute(“aria-label”, “Your description here”);}); |
Replace #myStrip with the actual element ID and update the description to match the image.
If Velo isn’t enabled on the site, background images in Wix are best treated as decorative — which is appropriate for most background image use cases anyway.
How to Add Alt Text in Squarespace
Squarespace 7.1 has a dedicated alt text field for most image types, making the process more straightforward than older versions of the platform.
Method 1: Image block
Click the image block you want to edit on the page. Click the pencil icon that appears to open the image settings panel. Inside the Content tab, find the dedicated “Alt Text” field, type your description, and click “Apply”.
Method 2: Gallery block images
Click the gallery block to select it, then click the pencil icon to open the gallery settings. Inside the settings panel, click the specific image you want to edit. Each image has its own “Alt Text” field; type your description for that image and apply.
Method 3: Image added inside a blog post
Open the blog post in the editor and click the image inside the post content. A small settings icon appears: click it to open the image settings. Enter alt text in the relevant field and save.
Background images in Squarespace
Background images in Squarespace sections and banners don’t support alt text through the editor interface. The workaround uses code injection.
Go to Settings → Advanced → Code Injection for a site-wide fix, or use Page Settings → Advanced → Page Header Code Injection for a specific page. Add the following script:
| <script> document.addEventListener(“DOMContentLoaded”, function() { var section = document.querySelector(“.your-section-class”); if (section) { section.setAttribute(“role”, “img”); section.setAttribute(“aria-label”, “Your description here”); } });</script> |
Replace .your-section-class with the actual CSS class of the section. Find this by right-clicking the section in Chrome, selecting “Inspect”, and looking at the class name in the HTML panel.
Note: Code injection is available on the Business plan and above. On lower Squarespace plans, background images are best left as decorative.
How to Add Alt Text to JPG, PNG, and SVG Files
A common question is whether it is possible to add alt text directly to an image file (such as JPG, PNG, or SVG), rather than through HTML or a CMS.
The short answer: not in a way that affects how websites or search engines read it.
Alt text lives in the HTML of the page, not inside the image file. What some tools call “alt text” at the file level is actually EXIF metadata or file properties – useful for organizing files locally, but not what Google or screen readers use when rendering a webpage.
That said, there are two non-web contexts where adding a description directly to a file matters: Microsoft Word documents and SVG files.
How to add alt text to an image in Microsoft Word
Word has a built-in alt text feature for images inside documents, which matters for document accessibility, particularly for PDFs exported from Word.
Right-click the image inside the Word document and select “Edit Alt Text” from the context menu. A panel opens on the right side of the screen with a text field. Type your description and close the panel. Word saves it automatically.
Alternatively, click the image to select it, go to the Picture Format tab in the ribbon, and click “Alt Text” in the Accessibility group. The same panel opens.
One thing to note: Word also offers a “Mark as decorative” checkbox in the same panel. Checking this is the Word equivalent of using alt=”” in HTML. It tells screen readers to skip the image.
How to add image alt text to an SVG
For SVG files used on a website, the method depends on whether the SVG is external or inline, covered in the HTML section. But if the SVG file itself needs an accessible title. For example, when the SVG is opened directly in a browser or used in a document, add a <title> element inside the SVG file:
| <svg xmlns=”http://www.w3.org/2000/svg” viewBox=”0 0 24 24″> <title>Download icon</title> <path d=”M12 16l-6-6h4V4h4v6h4l-6 6z”/></svg> |
Open the SVG file in any text editor, find the opening <svg> tag, and add the <title> element as the first child inside it. Save the file.
How to Test If Your Alt Text Is Working
Adding alt text is only half the job. Testing it confirms the text is actually being read correctly by browsers, screen readers, and search engines.
Chrome DevTools accessibility audit
Chrome DevTools has a built-in accessibility audit that flags images missing alt text or using unhelpful descriptions.
Open Chrome, go to the page you want to test, and press F12 (or right-click anywhere and select “Inspect”) to open DevTools. Click the “Lighthouse” tab at the top of the DevTools panel. Under Categories, check “Accessibility” and uncheck the others, then click “Analyze page load”. When the audit finishes, look for the “Images do not have alt attributes” section in the results.
The audit lists every image on the page that has a missing or empty alt attribute where one is expected. Click any flagged item to see exactly which image is causing the issue and where it is in the page’s HTML.
Inspecting alt text directly in DevTools
For a quicker check on a specific image, right-click the image on the page and select “Inspect”. The HTML panel highlights the <img> element for that image. Look at the alt attribute in the tag. Whatever value is there is what screen readers and Google are reading.
If the attribute is missing entirely, that’s a problem. If it says alt=””, the image is marked as decorative. If it contains a description, check that the description is accurate and useful.
Emulating slow connections
One of the most practical ways to see alt text in action is to simulate a slow or failed image load.
In Chrome DevTools, go to the Network tab and click the throttling dropdown (it usually says “No throttling”). Select “Slow 3G” or “Offline”. Reload the page. Images fail to load, and the alt text appears in their place. Exactly as a user with a poor connection would see it.
This is a quick visual check that confirms whether alt text is meaningful when seen out of context.
Google Search Console image performance
Search Console doesn’t directly show alt text, but it does show how images are performing in search. Go to Search Console → Search results and filter by “Image” search type. Pages with well-optimized images — including good alt text — tend to generate more image impressions and clicks over time.
If a page has strong rankings for text results but low image impressions for the same queries, weak or missing alt text is a likely contributing factor.
Screen reader testing
The most thorough test is using an actual screen reader to hear how alt text sounds when read aloud.
Three free options:
- NVDA (Windows) – free, widely used, works with Chrome and Firefox.
- VoiceOver – (Mac and iOS): built into Apple devices, no installation needed. Press Command + F5 on Mac to activate.
- TalkBack (Android) – built into Android, useful for testing mobile alt text behavior.
Navigate to the page using only the keyboard (Tab key to move between elements) and listen to how the screen reader announces each image. If the description sounds unhelpful, vague, or out of context when heard aloud, rather than read, it needs to be rewritten.
Frequently Asked Questions
What is alt text and why is it important?
How do you add alt text to a link?
What is the difference between alt text and a caption?
How do I add alt text to a background image?
Does alt text help SEO?
Can I use AI to write alt text?
What happens if I leave alt text empty?
Is there a character limit for alt text?
How do I add alt text to an SVG?
How do I check if my images have alt text?
The Bottom Line
Alt text is one of those things that takes five minutes to add and years to appreciate fully. Every image on a website is invisible to search engines and screen readers without it. Every image with good alt text is an opportunity for better rankings, better accessibility, and a better experience for every visitor regardless of how they access the page.
The method varies by platform: HTML, WordPress, Elementor, Shopify, Wix, and Squarespace, but the principle is the same everywhere. Describe what the image shows, match the description to its context on the page, keep it concise, and use empty alt text for purely decorative images.
Background images are the one consistent exception across every platform. None of them support native alt text for CSS backgrounds, and the workaround – role=”img” with aria-label – is the same regardless of the platform or method used.
Start with the pages that matter most: product pages, landing pages, and blog posts with high organic traffic. Audit them with Chrome DevTools, fix what’s missing, and build the habit of adding alt text at the point of upload rather than as a retroactive fix.
Leave a Reply